Monday, 28 May 2012

From demo/decon to build

Well, we've finally made it to the eve of "construction" rather than deconstruction or demolition. This past week was spent excavating and getting set to lay the foundation and with that, tomorrow, we start laying out the new footings and forming...very exciting.

It's been an interesting birthday week with a few twists and turns on the construction front. We started the week by spray painting the new foundation walls and then set to work with the mini-digger which couldn't be there until Tuesday (bye bye to another day).

Laying out the new footings for the foundation

Things I've learned throughout the course of the week:

1) The construction world is more akin to a four-day-work-week. It's almost impossible to get five days worth of work out of a given week. Invariably someone can't work, or something's not ready to go, so you lose at least one work day per week. It's pretty frustrating when you're paying about $100/day in overhead costs just to maintain the site, but it's what you deal with. Worth knowing for others however.

2) Our place was built upon not just silty-clay soils, but also a refuse heap. I'm not exactly sure when, but roughly around the turn of the century, our property was used as a bit of a dump pile. As we've been digging down through the soils, we've been uncovering all sorts of interesting things...the most interest of which was an old ink container (intact!) from 12-01-03 from the then-young Diamond Ink Co in the USA. Kinda cool to pull a piece of history like that out of your front yard!

Standard "stuff" that's coming out of the ground...mainly broken bottles, pieces of metal (e.g., half a spoon!)

The "gem"/artifact. Hey - eBay says it's worth $30! I'm rich!


3) Our slab was not built to support a mini-digger. Yep - a mini digger and bobcat managed to mangle the slab. Oh well...just means a bit more fill. At least they nicely dug out the foundations - three days and $3000 later that is... I must admit however, that it was pretty amazing watching him work actually...kind of like machine ballet!

A shot of the mini-digger at the front

Mini-digger at rest in the back yard...mushing our 1" thick slab

Job done!
And the end product...with a topping of $275 worth of rock.

4) I might (big MIGHT) own a green/living wall that holds a Guinness Book of World Records title. At EPIC! a couple of weeks ago, I chatted with the guys from By Nature Designs, who told me that they were actually selling the 11 foot living wall that they'd built. It wouldn't be cheap - probably about $2,000 by the time I got the system in place, with plants and an irrigation system plumbed in (no way to water something 11' in the air!)...BUT it would be amazing to look at, it would purify the air in the whole house, and it would be a definite talking piece.

The system uses these Modulogreen units which are recycled ABS plastic and allow one to independently pot plants in a soil medium (which differs from many living wall systems that use moss or something else and easily dry out). Full details are here.

Hard call as it would be a definite "luxury item" in the house...BUT I think it would be spectacular. Decisions, decisions!

These shots give you a sense of what it would look like:


5) Through all the pain of construction, Vancouver does remind me from time to time why it's so amazing out here. This past weekend was pretty spectacular. The weather was between 23 and 28 degrees blue skies for the most part. Kris and I took advantage of the weather and the pre-baby time to enjoy ourselves and had two days where we had some beach time. We also checked out some stores in town, and even began the quest for our new wood slab for our island countertop (more on that one in another post). But with views like this, how can you not love Vancouver?

View from English Bay at sunset


Pretty nifty desk from CB2

Interface FLOR tiles, which I think may be a neat addition to our house

Other random thoughts...
A) Still mulling over whether to put in a 14" Solatube or not. There's a big hole where the chimney was, and it would nicely illuminate the central space of the house, but it's not an energy efficient thing to do (you're basically shoving an R-5 hole in your roof which should be R-50). BUT conversely, it does add light to the middle of an area that's almost below grade...I think

B) Thinking about doing a wall in brick like this (see below). I'd aim to use the bricks that were reclaimed from the chimney and since they'd be sitting on the slab, the weight shouldn't be an issue (though I'd need to confirm that).


Out of steam for the night...

Wednesday, 23 May 2012

Digging away my time

This week has been foundation week. After taking the long weekend off, and losing a day because the mini-digger wasn't around on Tuesday, today we started excavations. As noted in the previous entry, we're removing the foundation walls and digging down about 2 feet down to the hard clay layer that sits under our place. The upside is that we'll always have filtered water available on our land...the downside, we have water sitting right below our house (and around our foundations). So, we're still planning on getting the ICFs set to go, but Brett (our project manager) has been pretty busy this week and so I'm not sure we're going to manage Friday for layout (let alone that I'm not sure the digger will be done).

I started the day over at the site at 7:30am and my morning went something like this:
6:45am: Alarm #1 (radio)
6:46: Ignore alarm
6:50am: Alarm #2 (buzzer)
6:50:30am:  Try to ignore alarm
6:51am: Get out of bed and turn off alarm
7:00am: Realize that I really do need to get going and get up and grab food
7:24am: Get a call from Tidy-Trailers that the Live-load guy is there on site
7:25am: Arrive on site, and help Tidy-Trailers to load up yet ANOTHER load of garbage (no doubt not the last)
7:45am: Finish opening things up and move metal from where the mini-digger has thrown it (it was all piled neatly the previous night). Wait for metal guy to arrive...
7:50am: James, Brett and Mark all arrive on site to prep for digger (who is supposed to arrive at 8am).
8:30am: Assist in spraying foundation digging areas, moving walls, etc. etc.
9:45am: Mini-digger guy finally arrives (much to Brett's chagrin)
10:20am: Digging underway
10:35am: Rhododendron removed (being given a new home)
11:30am: Depart site having helped get things out of the way of the digger, chatted with the sump/draintile guy, etc. etc.
Metal guy apparently showed up later (though he didn't take one, very heavy, thing?!); and we had James remain on site to make sure that the digger (which costs $125/hr) was busy the whole time.

By the time I returned to the site at 7pm to remove a cedar tree (also being given a new home), the concrete from the front was gone, the rear foundations were largely dug, and the mini-digger had also managed to mange parts of the slab (awesome).

In chatting with the sump/draintile guy I've realized that the City of Vancouver will require me to put in two sumps, but I needed to find out what the depth/elevation of the sewer line was (the so-called "invert elevation"): 102.857 feet. Now to put that into perspective, here's the various heights:

---- 106.5 --- proposed top of new slab
---- 105.17 -- existing slab

---- 103.17 -- clay layer (depth of new footings)

So....we've got about 6" of distance between where our draintile is going and the "invert elevation". The good news is that at least we're not BELOW that line (which would automatically mean we'd need to pump...which then requires a mechanical engineer and a lot of extra $)...but I'm not sure we're completely out of the weeds yet. I'll let you know soon enough however!

In other news, I have set up a meeting with the City of Vancouver (different dept) about running a Vancouver Green Residential Homes Open House tour for next year. This would be modeled upon something that I went to in Washington DC of all places: the not-so-aptly-named http://www.solartour.org/ (which isn't JUST solar homes...but whatever). When I was in DC last year I also went to another related event: http://www.solardecathlon.gov/ which was also pretty awesome. They all reminded me of the Doors Open Toronto event I went to a number of years ago where they featured a bunch of green buildings - both commercial and residential. It was probably the place where much of this insanity began, so in order to pay the pain forward, I thought I'd entrance others! :) No, in all seriousness, I'd like to share the experiences I've had - for better or worse - and help others from going through some of the pain I'm currently experiencing. So, we'll see how it all plays out. I've also chatted with the folks at Greenworks Building Supply (http://www.greenworksbuildingsupply.com/) who are also keen on seeing it happen, so fingers crossed. Not that I need another project....

Aside from some pics, that's all for now.

Front of house with concrete rubble pre-clearing

The rhodo seeking a ride to its new home

All staked-out and ready to build (or at least dig)

The mini-digger in action

The mini-digger not in action

The house at 7:15pm on May 23, 2012


Newly dug holes for our footings/foundation

Monday, 21 May 2012

Building from the ground up

So after some additional exploratory demolition this week, we've come to accept some realities:

1) There are no footings for our foundations (they are poured on grade).
2) We need footings (given our soil and moisture issues).
3) Given the weight of the soil (HEAVY), we need to have a mini-digger in to excavate.

So - this past week was "break up the foundations with a jackhammer and get ready for the mini-digger" week, as well as cut away the lower wall sections (which I'm aiming to convert into furniture...ambitious, but we'll see).

Given the fact that our house sits on a clay lens which means that when it rains, we get a puddle of water below our house about 6-8 inches deep, I'm feeling like "damproofing" the footings simply isn't sufficient. Concrete wicks moisture and so if you're footings are sitting in standing water, welcome to wet walls. Accordingly, I'm going to opt to go with an interesting new "technology" (hard to call a bag "technology") in which your footings are poured into a waterproof bag. The company is called Fab-Form and they offer not only these "footing in a bag" (called Fastfoot), but also Insulated Concrete Forms (ICFs), which are styrofoam blocks that allow you to form and pour concrete that is automatically insulated. We're still finalizing exactly who we'll use, but the plan is to create a foundation with roughly R30 footings.

I spent the weekend moving concrete around (which I'm aiming to reuse in the garden for retaining walls), as well as organizing wood, and getting set for the digging machine to come in. Here are some pics of the place as it stands:

Concrete, wood, gravel....oh my! Now organized far better than this. 
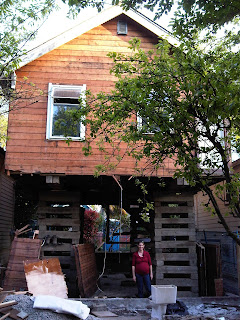
Our elevated house, now with a fancy blue fence!

Foundation, in block form, ready for life as a garden wall

The side of our house, foundations broken.

View to the front of the house with cribbing partially filled with gravel for mini-digger to get through

Kristina at the rear of the house - May 17, 2012


On Saturday, we also hung out on our block and solid a whole $13 dollars worth of "stuff" that we were aiming to get rid of (as well as spent $0.50!), but did get a chance to meet more of our neighbours which was great. We continue to be happily surprised at the new community we'll be joining come fall.

Hopefully by the end of this week we'll have our foundations dug, and the foundation ready to pour for the following week *fingers crossed*.


Saturday, 12 May 2012

Countdown and.....lift-off!

VANCOUVER, BC (AP) - On Wednesday, just after 1:00pm, it happened: the crap shack took flight. After weeks of preparation, it finally happened. So I'll go back a few days to take you through the journey of the last little while...

I believe last time we left our heroes, they were facing a place that looked something like this. Filled with layers of stuff, asbestos, non-containing vermiculite (more on that), etc.and still needing a LOT of work, I continued to work evenings and weekends to transform the place from this:


To this...


To this...


However, in the process, (shock of all shocks), I found, you guessed it...MORE hazmat stuff...So, called up fleck and they came back to remove more vermiculite, more insulation, and even more asbestos-containing flooring that hadn't been picked up. It was mainly just sloppy work - they hadn't diligently gone through the house. So, they came back through and throughly vacuumed and got rid of "most" of it. I still had the vermiculite raining down upon me even after that (while removing some of cedar shakes that connected into the attic - yes, was wearing an approved respirator and other equipment), and on top of that, they had damaged the floor joists, broke a window, damaged piping...and on lift day, we found....MORE asbestos containing tape (on duct work)...so...they came back AGAIN...


The state of the cleanup, "post" cleanup... You can
see the vermiculite mixed into the grey insulation
A nice cut through our sub-floor (which extended into the joists)

I also spoke with Worksafe BC and after a lot of beauracratic bafflegag, the official line I got was this: unless you've sampled every speck of vemiculite (which would cost more to sample than to remove), Worksafe treats it as asbestos (to cover their arses). So, lesson is: vermiculite = asbestos (even if it it is the equivalent of potting soil). Awesome.

With the hazmat chapter NEARLY done (we still need to sort out payment and get our hazmat clearance certificate), I moved on to nail removal. A LOT of nail removal...my my rough estimation about 20,000 nails (a little over 1200 sq.ft. of wall, with on average about 16 nails per square foot). Probably the most challenging aspect of this was establishing and taking down the 21' high scaffolding by myself. The good news? (A) It's done, and (B) it trimmed 13 lbs off of me in the process with no injuries in the process aside from the odd nail poke and scratch (and a lot of sore muscles).


That left us with the this one the interior:

The other big job was getting four 5'x5' holes dug in the slab (the big block of concrete that is the "basement floor"), which differs from the foundation (which are basically the "concrete walls" that the weight of the house rests upon). James (one of the general trades people working on the site who will be assisting throughout) cut a line into the slab using a jackhammer, but we quickly realized that the slab was only about 1.5" thick, meaning that a 17 lb. sledge hammer did the job with no problem. Once we were through the slab, the digging began...and kept going...through a 3" organic layer, and then about 36" of thick clayish loam, before we hit water, and finally a clay lens (hard pan). If it's not already obvious, it was HEAVY work with VERY sticky soils that made for slow work. Furthermore, we found out that with 6-12" of standing water in the holes, we needed to add gravel, so that then got sorted. But, after several days of slogging soil and moving gravel, we were set with four holes, approved by Henry Hsu (our structural engineer from Formosa Engineering - who has been wonderful).

My what a lovely hole in the floor!
With things set to go, on Wednesday, May 9th, we obtained a permit from City Hall (they love their permits!) to block off half of the street, and brough in Zebiak for the lift. I arrived on site at 7:30am and met up with James and Mark (our site superintendent). We worked to finish up the lift prep (get the gravel level, pump out water that had built up in the holes), remove some boards, garbage, etc. etc. and we were set.


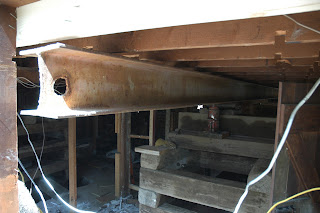
The crew of four guys from Zebiak arrived at around 8:30 and started setting up the "cribbing" (basically - jenga for houses). Each block is about 8" x 8" x 4' and weighs about 50 lbs. These are stacked up to near the ceiling and that took about 3 hours to get set. After that, they brought along a crane and unloaded the 30' steel beams (one of the two small hiccups of the day was that the house is 32' long - they "extend" the steel beams using cribbing...the other hiccup being the fact that we had originally said "about 4 feet" for the raise, not 4'9" which was the actual height...which we managed to sort in the end with an extra hour's work).

Here you can see the crane unloading the first of the beams
The beam ever-so-carefully being manoevred past the "prized" oak trees
on our street (seriously, the crane operator was an artist)
Here you can see the cribbing, a jack, the beam, and how it fits in with the existing ceiling joists.

With all of the pieces in place, around 13:00 Pacific Daylight Time, we had lift off! I barely even noticed it at first because they only took it up an inch or so, but eventually, they got things moving...and once the lift was underway it was pretty fast. They go up about 14" in a single "lift" which takes about 90 seconds, and then the add additional cribbing before resetting and repeating the process. Ultimately they did about 5 lifts and here was the result:


In the end, this was the change...


Pre-lift
Mid-lift

Post-lift

 I've got some video as well that I'll add soon, but for now I'll leave you with this as a parting shot - it gives you a good sense of how much the house is now UP in the air.