I believe last time we left our heroes, they were facing a place that looked something like this. Filled with layers of stuff, asbestos, non-containing vermiculite (more on that), etc.and still needing a LOT of work, I continued to work evenings and weekends to transform the place from this:
To this...
 |
| The state of the cleanup, "post" cleanup... You can see the vermiculite mixed into the grey insulation |
 |
| A nice cut through our sub-floor (which extended into the joists) |
I also spoke with Worksafe BC and after a lot of beauracratic bafflegag, the official line I got was this: unless you've sampled every speck of vemiculite (which would cost more to sample than to remove), Worksafe treats it as asbestos (to cover their arses). So, lesson is: vermiculite = asbestos (even if it it is the equivalent of potting soil). Awesome.
With the hazmat chapter NEARLY done (we still need to sort out payment and get our hazmat clearance certificate), I moved on to nail removal. A LOT of nail removal...my my rough estimation about 20,000 nails (a little over 1200 sq.ft. of wall, with on average about 16 nails per square foot). Probably the most challenging aspect of this was establishing and taking down the 21' high scaffolding by myself. The good news? (A) It's done, and (B) it trimmed 13 lbs off of me in the process with no injuries in the process aside from the odd nail poke and scratch (and a lot of sore muscles).
That left us with the this one the interior:
The other big job was getting four 5'x5' holes dug in the slab (the big block of concrete that is the "basement floor"), which differs from the foundation (which are basically the "concrete walls" that the weight of the house rests upon). James (one of the general trades people working on the site who will be assisting throughout) cut a line into the slab using a jackhammer, but we quickly realized that the slab was only about 1.5" thick, meaning that a 17 lb. sledge hammer did the job with no problem. Once we were through the slab, the digging began...and kept going...through a 3" organic layer, and then about 36" of thick clayish loam, before we hit water, and finally a clay lens (hard pan). If it's not already obvious, it was HEAVY work with VERY sticky soils that made for slow work. Furthermore, we found out that with 6-12" of standing water in the holes, we needed to add gravel, so that then got sorted. But, after several days of slogging soil and moving gravel, we were set with four holes, approved by Henry Hsu (our structural engineer from Formosa Engineering - who has been wonderful).
 |
| My what a lovely hole in the floor! |
The crew of four guys from Zebiak arrived at around 8:30 and started setting up the "cribbing" (basically - jenga for houses). Each block is about 8" x 8" x 4' and weighs about 50 lbs. These are stacked up to near the ceiling and that took about 3 hours to get set. After that, they brought along a crane and unloaded the 30' steel beams (one of the two small hiccups of the day was that the house is 32' long - they "extend" the steel beams using cribbing...the other hiccup being the fact that we had originally said "about 4 feet" for the raise, not 4'9" which was the actual height...which we managed to sort in the end with an extra hour's work).
 |
| Here you can see the crane unloading the first of the beams |
 |
| The beam ever-so-carefully being manoevred past the "prized" oak trees on our street (seriously, the crane operator was an artist) |
 |
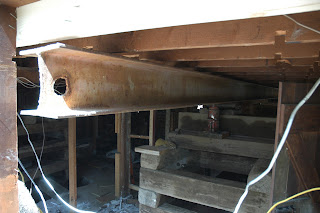
| Here you can see the cribbing, a jack, the beam, and how it fits in with the existing ceiling joists. |
 |
| Pre-lift |
 |
| Mid-lift |
 |
| Post-lift |
I've got some video as well that I'll add soon, but for now I'll leave you with this as a parting shot - it gives you a good sense of how much the house is now UP in the air.


No comments:
Post a Comment